-
 Call Now ! +971503930741
 -
 Contact Email info@cadcamteacher.com

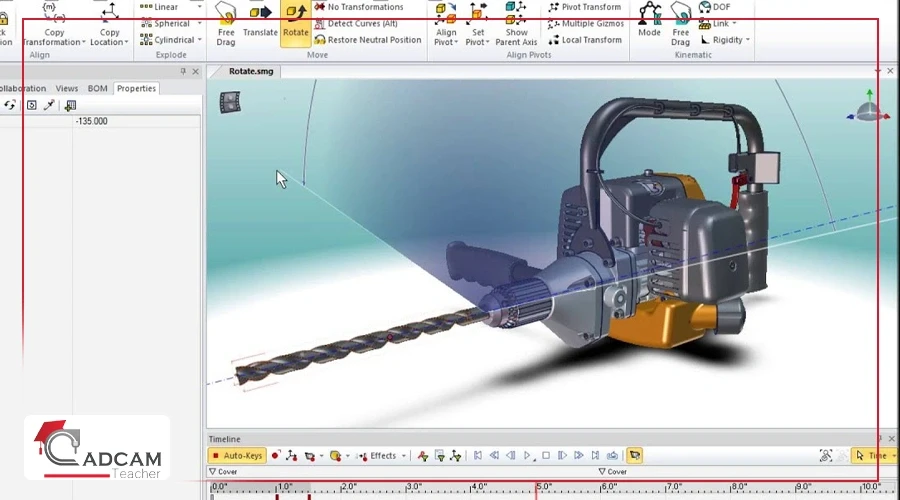
SolidWorks Composer is a powerful tool that simplifies the process of creating professional and interactive 3D visualizations, animations, and technical documentation. Whether you are a designer, engineer, or technical communicator, understanding how to utilize SolidWorks Composer can significantly enhance your project delivery. This SolidWorks Composer tutorial aims to guide you through the essential steps to maximize your productivity and create impactful visuals.
Access a free comprehensive guide to learn CAD CAM.
SolidWorks Composer is a software application designed to create 2D and 3D visual content directly from CAD models. It streamlines the process of producing high-quality documentation, such as assembly instructions, exploded views, animations, and interactive manuals. By using SolidWorks Composer, you can ensure your technical content remains synchronized with the latest design updates, reducing errors and improving communication.
Advantages of solidworks composer include:
Seamless Integration with SOLIDWORKS – Composer works alongside SOLIDWORKS, ensuring documentation updates automatically with design changes, even before finalizing the CAD model.
No CAD License Required – As a standalone software, Composer frees up CAD licenses for designers and engineers, making it more accessible.
Fast Content Generation – Save time by batch-exporting model views, animation frames, and 360-degree visuals instead of capturing manual screenshots.
Interactive Visuals – Navigate assemblies in 3D, add interactive elements, and enhance clarity in technical documentation.
Flexible Publishing Options – Export projects to HTML or SVG for easy access without extra software installations.
Embedded 3D Viewing – Use ActiveX controls to integrate Composer Player into HTML files, enabling a full 3D experience within a web browser.
book now
Solidworks Essentials
Before diving into the SolidWorks Composer tutorial, let’s explore some of its standout features:
Interactive Animations: SolidWorks Composer enables you to create dynamic animations that illustrate processes and workflows.
Exploded Views: Generate detailed exploded views to showcase assembly and disassembly procedures.
Technical Illustrations: Create vector-based 2D illustrations directly from 3D CAD data.
Customizable Views: Adjust colors, textures, and transparency to create visually appealing documentation.
Seamless CAD Integration: Works seamlessly with SolidWorks CAD and other 3D file formats.
To follow this SolidWorks Composer tutorial, you need access to the software and some basic knowledge of CAD tools. Here’s a step-by-step guide to help you get started:
Open SolidWorks Composer and navigate to File > Open.
Import your CAD model. SolidWorks Composer supports various file formats, including SolidWorks parts and assemblies, STEP, and IGES.
Once the model is loaded, use the navigation tools to explore and familiarize yourself with the 3D geometry.
Use the View Pane to create static views of your model. These views serve as snapshots of the current model orientation and settings.
Adjust the camera angle, zoom, and perspective to highlight key components.
Save the view by clicking the Capture View button.
Switch to the Exploded View tab.
Select parts or subassemblies to drag them apart manually or use the automatic explode feature.
Add annotations to identify parts and specify steps for assembly or disassembly.
Open the Timeline panel to start creating animations.
Drag components to define their movements over time. Add rotation, scaling, or transparency effects to enhance the animation.
Preview the animation to ensure smooth transitions and logical sequencing.
Use the Technical Illustration tools to generate detailed 2D drawings.
Add labels, callouts, and leader lines to clarify assembly instructions.
Customize the appearance with line styles, thickness, and shading options.
Once your documentation is ready, export it in various formats. SolidWorks Composer supports PDFs, SVGs, MP4s, and HTML5 interactive content.
read also
solidworks essentials course
To make the most of this SolidWorks Composer tutorial, consider these best practices:
Organize Your Workflow: Keep your project files and views well-organized for easy access.
Use Templates: Leverage existing templates to maintain consistency across your documentation.
Test Interactivity: If creating interactive manuals, ensure all links and animations work correctly.
Regular Updates: Update your documentation whenever design changes occur to avoid discrepancies.
Optimize Performance: Use lightweight CAD models for better software performance.
learn more
SOLIDWORKS course
Implementing SolidWorks Composer into your workflow offers numerous advantages:
Time Efficiency: Quickly create technical content without redrawing CAD models.
Improved Accuracy: Ensure documentation aligns with the latest designs.
Enhanced Communication: Facilitate clear and effective communication between teams and stakeholders.
Professional Quality: Produce visually stunning content that enhances your brand’s professionalism.
Once you’ve mastered the basics from this SolidWorks Composer tutorial, explore advanced techniques to elevate your skills:
Custom Styles: Create custom styles for annotations and illustrations to match your brand identity.
Hotspots and Links: Add interactive hotspots to your documents for a better user experience.
Batch Processing: Use batch processing to update multiple views or files simultaneously.
API Integration: Explore the Composer API for automating repetitive tasks.
Learning Resources: Utilize SolidWorks Composer’s online tutorials, forums, and user communities for continuous learning.
SolidWorks Composer is an indispensable tool for creating impactful visual content that bridges the gap between design and communication. By following this SolidWorks Composer tutorial, you can harness its features to streamline your workflow, enhance your technical documentation, and deliver professional results. Start practicing today to unlock the full potential of SolidWorks Composer and take your projects to the next level contact with CADCAM Now
read also
cnc courses for beginners